Tuesday, October 1, 2024

Halloween Squishes

Good morning crafty friends!  Today I'm sharing a fun Halloween card using digital products by Streamside Studios

These cute images are from the Halloween Squishes and Little Halloween 1 digital stamps.  I cut a panel of bristol card and inked it with Seedless Preserves, Wilted Violet, Chipped Sapphire, and Black Soot Distress Oxide Inks, and splattered it with black acrylic paint and white gouache.  I die cut the black frame and spooky tree from black card stock using a die from my stash and adhered it to the inky background.  I colored the images with copics and then fussy cut them.  I adhered the images with foam tape and then added a few die cut stars to finish off my card.

Streamside Studios has a monthly challenge over on Instagram!  Check out their IG account to find all the details!

Thanks so much for stopping by.  I hope you have a fantastic day!

Hugs, Anita 

Sunday, September 29, 2024

Sweet Holiday Greetings

Hello friends!  Today I'm sharing a clean and simple Christmas card featuring some adorable snowmen by Whipper Snapper Designs!


I've had this cute stamp for years and this is the first time I've ever inked it up.  I've really been trying to pull out some of my older never-used stamps and create with them!  I cut a piece of bristol card and inked it with Peacock Feathers, Prize Ribbon, and Chipped Sapphire Distress Oxide Inks.  I splattered it with thinned white gouache and adhered it to my card front.


I colored the snowmen with copics and then applied Nuvo Crystal Glaze to their noses and buttons.  I fussy-cut the snowmen and then used a white gel pen to add some highlights.  I adhered the snowmen with foam tape and added some die cut snowflakes.  The sentiment is from a stamp set in my stash.

Thanks so much for stopping by.  Have a fantastic day!

Hugs, Anita

Wednesday, September 25, 2024

Trick Or Treat

Hello friends and happy Wednesday!  I'm sharing a Halloween card featuring a fun digital stamp.

This cute witch and her kitty are by Andrea LaGafotas.  I found this stamp a couple of years ago in her Etsy shop and I finally found some time to color this sweet image!  I just checked her shop and I no longer see this digital stamp listed but you may be able to message her and inquire about it.  I absolutely adore their giant eyeglasses lol.  I die cut a panel of bristol card and used a stencil and distress oxide inks to create the cloudy background.  

I printed the images on Neenah card stock, colored them with copics, and fussy-cut them.  I adhered the images to the card with foam tape for added dimension.  The die cut sentiment is from my stash and I believe it was from Reverse Confetti (which is no longer in business).

Thanks so much for stopping by.  I hope you have a wonderful day!

Hugs, Anita  

Tuesday, September 24, 2024

You're Pumpkin Spice & Everything Nice

Hello friends!  Today I'm sharing a card featuring a new digital stamp from the Streamside Studios shop.

This adorable image is Pumpkin Latte.  There are two images included in the set, along with lots of fun sentiments so be sure to stop by and check it out!  I printed the image and sentiment on Neenah card stock and then die cut the panel with a stitched rectangle die.  I colored the image with copics and then masked it so I could add Peacock Feathers Distress Oxide Ink to give the image some shading.


Thank you so much for stopping by.  I hope you have a great day!

Hugs, Anita  

Saturday, September 21, 2024

You Are Spook-Tacular

Hello friends!  Today I'm sharing a Halloween card featuring a sweet little witch from the LTTS Doodles Etsy shop. 

I cut a panel of bristol card and inked it with Seedless Preserves, Chipped Sapphire, and Black Soot Distress Oxide Inks.  I splattered the panel with white gouache and thinned black acrylic paint and adhered it to my card.  I used a die from Hello Bluebird to die cut the spooky trees from black card stock and adhered it to my card.  I printed the cute witch on Neenah card stock, colored her with copics, and fussy cut her.  I adhered the witch to my card with foam tape.  Lastly, I heat embossed a sentiment from my stash and adhered it to the card with foam tape also.

Thanks so much for stopping by.  I hope you have a great weekend!

Hugs, Anita  

Tuesday, September 17, 2024

Happy Halloween

Good morning crafty friends!  Today I'm sharing a Halloween card featuring one of the new digital stamps by Streamside Studios.  

These cute bats and sentiment are from the Halloween Squishes digital stamp set.  There are lots of fun images and sentiments in this set so be sure to stop by the shop and check it out!  I diecut a stitched rectangle from bristol card and used a cloud stencil to ink clouds with Peacock Feathers, Chipped Sapphire, and Black Soot Distress Oxide Inks.  I splattered the panel with both white gouache and black acrylic paint.  I printed one of the sentiments from the stamp set on the inked panel and then adhered some tiny black stars that I diecut from black card stock.  I printed the bats on Neenah card stock, colored them with colored pencils, and fussy-cut them.  I used a white gel pen to add highlights to the bats and adhered them to my card with foam tape. 

Thanks so much for stopping by.  I hope you have an amazing day!

Hugs, Anita  

Sunday, September 15, 2024

Christmas Wishes

Good morning crafty friends!  I'm sharing a fun Christmas card featuring stamps by Streamside Studios!


This sweet snow couple is from the Snow Much Happiness clear stamp set.  The sentiment is from the Merry Christmouse clear stamp set.  I cut a piece of bristol card 4.25" x 5.5" and heat embossed white snowflakes on the panel.  I added distress oxide inks to the panel and then splattered it with Liquid Stardust to add some shimmer.  I adhered a snowy slope to the card.  I diecut a stitched frame from white card stock and adhered it to the card with foam tape.


I colored the snow couple with copics and added stripes and polkadots with a white gel pen.  I added Nuvo Crystal Glaze to the berries and buttons.  I  fussy-cut the snowmen and adhered them to my card with foam tape.  

Thanks so much for stopping by.  I hope you have a fabulous day!

Hugs, Anita      

Wednesday, July 31, 2024

Meet Me At The Beach

Hello crafty friends!  Today I'm sharing a card featuring a new digital stamp by Streamside Studios

These adorable images are from the Beach Critters 2 stamp set.  The stamps in this set coordinate perfectly with the Beach Critters stamp set so stop by the shop and check them out!   I created the background by applying Frayed Burlap, Tumbled Glass, and Prize Ribbon Distress Oxide Inks on a panel of bristol card and then splattering it with water.  Once dry, I printed the sentiment on the panel.  I colored the images with copics, fussy-cut them, and then adhered them to the card with foam tape.  I used Nuvo Crystal Glaze to the sunglasses and puppy's noses.

Thanks so much for stopping by.  I hope you have an amazing day!

Hugs, Anita 

Monday, July 22, 2024

Sending Waves Of Smiles

Good morning crafty friends!  Today I'm sharing a cute and colorful summer card featuring a digital stamp by Amanda Jayne Designs.


This adorable stamp is Beach Girl and you can find it in the Amanda Jayne Designs Etsy Shop!  I inked a panel of bristol card with Frayed Burlap, Salty Ocean, and Tumbled Glass Distress Oxide Inks.  I splattered the panel with water and then splattered the sandy area with thinned brown acrylic paint.  Once the panel was dry, I adhered it to my card.  I printed the images on Neenah cardstock, colored them with copics, and fussy-cut them.  I stamped a sentiment on the card and then attached the images with foam tape.

Thanks so much for stopping by!  I hope you have a fabulous day!

Hugs, Anita

Wednesday, June 26, 2024

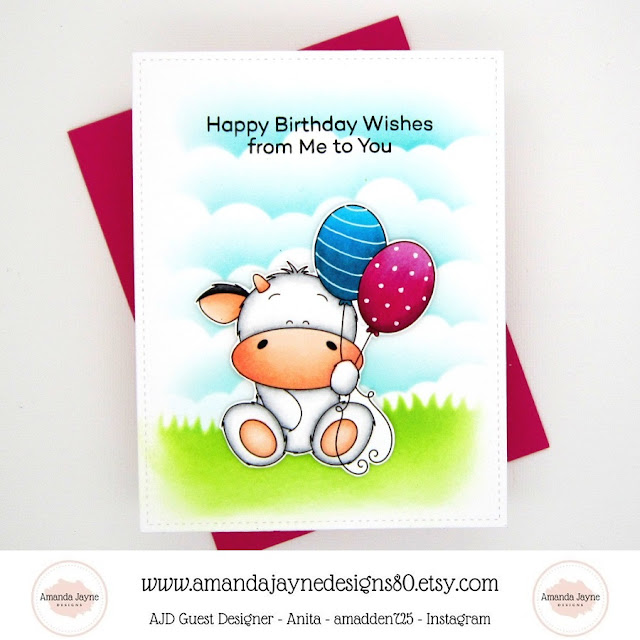
Happy Birthday

Good morning!  I'm guest designing for Amanda Jayne Designs and today I'm sharing a fun birthday card!


I used the Balloon Cow digital stamp for this card.  You can find all of Amanda's digital stamps in her Etsy shop!  I created the background using stencils and Mowed Lawn and Peacock Feathers Distress Oxide Inks.  I printed the image on Neenah card stock, colored it with copics, and fussy cut it.  I used a white gel pen to add stripes and polka dots to the balloons.  I adhered the image to my card with foam adhesive.

Thanks so much for stopping by.  I hope you have a wonderful day!

Hugs, Anita

Sunday, June 23, 2024

What's Up Dude?

Hello crafty friends!  Today I'm sharing a fun summer card featuring a new digital stamp set by Streamside Studios.

These cute stamps are from the new Beach Critters digital stamp set.  There are so many summer critters in this set so be sure to check them out!  I created the sand, water, and sky with distress oxide inks and splattered them with water.  I printed one of the sentiments from the stamp set on the sky.  I colored the images with copics and fussy cut them.  I used Nuvo Crystal Glaze on the sunglasses to give them some shine.  I adhered the images with foam tape for dimension.

Thanks so much for stopping by.  I hope you have a fabulous day!

Hugs, Anita

I'm entering my card in the MFT Card Cue Challenge - Summer Lovin'

Saturday, June 15, 2024

Mice Birthday

Hello crafty friends!  Today I'm sharing a sweet birthday card I made using one of my favorite stamp set by Pink and Main.

This adorable mouse is from the Mice Birthday stamp set.  I cut a panel of white card stock and stenciled clouds using Spun Sugar Distress Oxide Ink and a cloud stencil from My Favorite Things.  I adhered a strip of black/white paper along each edge of the cloud panel and adhered it to my card.  I stamped one of the sentiments from the stamp set on the card.  I stamped the mice with balloons on Neenah card stock, colored it with copics, and fussy cut it.  I added some highlights to the balloons with a white gel pen and adhered it to my card with foam tape.

Thanks so much for stopping by.  I hope you have a wonderful weekend!

Hugs, Anita   

I'm entering my card in the Simon Says Wednesday Challenge - Bright and Cheerful.

Wednesday, June 12, 2024

Miss You

Hello friends!  I'm sharing a card featuring some of the amazing products that Altenew generously gifted me.

These beautiful blooms are from the Fragrant Peony Layering Die Set.  I seldom make floral cards but this layering die set made this card so easy!  I die cut all the blooms and foliage from white card stock and then I inked them with Spun Sugar, Kitsch Flamingo, Picked Raspberry, Twisted Citron, Mowed Lawn, Rustic Wilderness, Wild Honey, and Spiced Marmalade Distress Oxide Inks.  I splattered everything with thinned white gouache and once they were dry, I assembled flower layers.  There's an instruction sheet included with the dies that makes the assembly so easy.  I die cut the Grid Cover Die from white card stock and adhered that to my card.  Next, I adhered the flowers with foam tape and tucked the foliage behind the flowers with liquid adhesive.  I heat embossed a sentiment from the Hug Me stamp to finish my card.

Altenew has generously gifted me two $25 gift cards for a giveaway over on my Instagram account.  Hop over to IG and check it out.

Thanks so much for stopping by.  I hope you have a fabulous day!

Hugs, Anita

Saturday, June 8, 2024

Hug Me

Good morning friends!  Today I'm sharing two cards I made with some awesome products that Altenew sent me.


Both of these cute images are from the Hug Me stamp set.  I colored both images with copics and then die cut them using the coordinating Hug Me die set.  For my first card I cut a panel of white card stock and inked it with Picked Raspberry Distress Oxide Ink.  I stamped a few hearts from the stamp set with the same ink and adhered the white panel to the black card base with foam tape.  I used a black gel pen on the fox's eyes and nose and then adhered the image with foam tape.


For my second card, I used the Grid Stencil and Peacock Feathers Distress Oxide Ink to create the background of my card.  I stamped a sentiment from the stamp set on the card and then adhered the fox with balloons with foam tape.  I used a black gel pen on the fox's eyes and a white gel pen to add highlights to the balloons.

I'm having a giveaway over on my Instagram account.  Hop over and check it our for a chance to win one of two $25 giveaways!

Thanks so much for stopping by.  I hope you have a wonderful day!

Hugs, Anita 

Friday, June 7, 2024

Stu-panda-ous Birthday

Hello friends!  Today I'm sharing a fun birthday card featuring one of the newer clear stamps by Streamside Studios!


These sweet images are from the Par-Tea Pandas stamp set.  I colored all the images with copics and fussy cut them.  I used a white gel pen to add highlights to the balloons, hats, and present.  I die cut a collage frame from Waffle Flower and inked the sections with Spun Sugar and Tumbled Glass Distress Oxide Inks.  I adhered the collage frame to black card stock and then adhered that to my card base.  I stamped one of the sentiments from the stamp set and then adhered the images with foam tape.  I used a black Micron pen to add the balloon strings.

Thanks so much for stopping by.  I hope you have a wonderful weekend!

Hugs, Anita 

Sunday, June 2, 2024

You're Wonderful

Hello crafty friends!  I hope you're having a fabulous weekend.  Today I'm sharing a card I made for the sketch challenge over on the My Favorite Things Blog!


This sweet image is from the My Favorite Things Pure Innocence collection and it's called Loads Of Thanks.  This stamp is no longer available in the MFT Shop but there are other Pure Innocence stamps available so stop over and check them out!  I cut a piece of Doodlebug Design paper 5.25" x 5.5" for the base of my card.  I used the Stitched Circle Stax die to cut a circle from white card stock and inked it with Mowed Lawn and Peacock Feathers Distress Oxide Ink.  I splattered the circle with white gouache and adhered it to my card.  I stamped the image on Neenah card stock, colored it with copics, and die cut it using the coordinating dienamic.  I used a black gel pen on the girl's eyes and the buckles on her overalls.  I adhered the image with foam tape.  The sentiment is from a stamp in my stash.

I'm entering my card in the MFT Weekly Sketch Challenge MFTWSC700 and the MFT Card Cue Challenge - Flower Power.   I'm also entering my card in the Simon Says Wednesday Challenge - Anything Goes

Thanks so much for stopping by!  I hope you have an amazing day.

Hugs, Anita

Friday, May 31, 2024

Waddle You Know

Hello crafty friends!  Today I'm sharing a fun birthday card featuring a clear stamp set by Streamside Studios.

These adorable ducks are from the A Ducky Day clear stamp set.  I die cut a scalloped rectangle and inked it with Mowed Lawn and Peacock Feathers Distress Oxide Inks.  I splattered the panel with white gouache.  I stamped the images on Neenah card stock, colored them with copics, and fussy cut them.  I used a white gel pen to add highlights to the colored images.  I stamped one of the sentiments from the stamp set and then adhered the images with foam tape.

Thanks so much for stopping by.  I hope you have a fabulous day!

Hugs, Anita

I'm entering my card in the Simon Says Wednesday Challenge - Anything Goes

Thursday, May 23, 2024

I'm So Fortunate To Have You

Hello crafty friends!  Today I'm sharing a very clean and simple card featuring a stamp by Streamside Studios.


This cute little fortune cookie and sentiment are just two of the many stamps included in the Par-tea Pandas stamp set.  Be sure to check out the stamp set in the shop!  I die cut a stitched rectangle from white card stock and inked it with Spun Sugar Distress Oxide Ink.  I splattered it with both white and pink acrylic paints to add some texture.  I stamped the fortune cookie on neenah card stock, colored it with copics, and fussy-cut it.  I adhered the fortune cookie with foam tape and stamped the sentiment below the cookie.

Thanks so much for stopping by.  I hope you have an amazing day!

Hugs, Anita

Sunday, May 19, 2024

Happy Birthday

Hello friends!  I'm excited to be guest designing for Amanda Jayne Designs!  


You can find all of Amanda's adorable digital stamps in her etsy shop!  This stamp is called Cupcake Cow.  I wanted to make a shaped card so I used a scalloped circle die to die cut my card.  I inked the inside circle with Spun Sugar and Cracked Pistachio Distress Oxide Inks.  I printed the digital stamp on Neenah cardstock, colored it with copics, and fussy-cut it.  I adhered the image with foam tape.  Lastly, I adhered a die cut bow that I colored to match the card.

Thanks so much for stopping by!  I hope you have an awesome day!

Hugs, Anita  

Sunday, May 12, 2024

Happy Mother's Day

Hello friends!  Happy Mother's Day to those of you that celebrate!  I'm guest designing for Wondering Wabbit (on Instagram) and today I'm sharing another one of her fabulous May release digital stamps!

This adorable girl is Veronica and you can find her in the Wondering Wabbit ko-fi shop.  Just hop over to Instagram, find the @wonderingwabbit account, and click on the link in her profile!  I kept my card very simple.  I die cut a scalloped rectangle and inked it with Iced Spruce and Spun Sugar Distress Oxide Inks.  I adhered the rectangle to my card base and then adhered the sentiment strip with foam tape.  I colored Veronica with copics, fussy-cut her, and also adhered her with foam tape.

Copics:

Skin - E13, E11, E21, E00, E000, R20

Hair - E55, E53, E51, E50

Dress/Shoes/Bow - BV13, BV02, BV00, BV000; BV20, BG70


Thanks so much for stopping by!  I hope you have a beautiful day!

Hugs, Anita

Wednesday, May 8, 2024

Born To Be A Mermaid

Hello crafty friends!  I'm so excited to be guest designing this month for  @wonderingwabbit on Instagram.

This beautiful Maisy mermaid digital stamp was created by Nathalie of @wonderingwabbit.  I die cut a panel of bristol card and inked it with Brushed Corduroy, Tea Dye, Wilted Violet, Chipped Sapphire, and Peacock Feathers Distress Oxide Inks.  I splattered the panel with water, thinned white gouache, and a bit of thinned brown acrylic paint.  I printed the sentiment along the top of the panel.

I printed Maisy on Neenah card stock, colored her with copics, and fussy cut her.  I used a white gel pen to add texture to her fin.  I adhered the mermaid directly to my card and then added a few clear bubble embellishments.

Copics:

Skin - E13, E11, E21, E00, E000; R20; C3, C1

Hair - E37, #99, E97, YR21

Top/Fin - RV66, RV55, RV52, RV10

You can find this sweet mermaid and other amazing digital stamps in Nathalie's ko-fi shop.  Just hop over to Instagram and click on the link in her profile.

Thank you so much for stopping by!  I hope you have an amazing day!

Hugs, Anita


Saturday, April 27, 2024

Hello Friend

Happy Saturday everyone!  Today I'm sharing a card featuring an adorable digital stamp from the My Enchanted Colors ko-fi shop!


You can find My Enchanted Colors and her ko-fi shop on Instagram.  She has the sweetest digital stamp so be sure to hop over and check her out.  To begin my card, I cut a 4.25" x 5.5" piece of polka-dot paper from my stash.  Next, I die cut some frames from both yellow and white card stock.  I glued 3 layers of the white frame together and then glued a yellow frame over those.  I cut a piece of white card stock to fit the frame and inked it with Mowed Lawn, Tumbled Glass, and Peacock Feathers Distress Oxide Inks.  I stamped a sentiment on the inked panel, glued it behind the layers of frames, and adhered it to my card.  I printed the images on Neenah card stock, colored them with copics, and fussy cut them.  I used a white gel pen to add highlights to the flowers and bees' cheeks and I used a black gel pen on the bees' eyes and antennae.  I added some Glamour Dust to their wings to give them some sparkle.  I adhered the flowers and bees directly to the inked panel and then attached the bunny over the frame with foam tape.

Thanks so much for stopping by.  I hope you have a wonderful and fun weekend!


Hugs, Anita 

Tuesday, April 23, 2024

Hope Your Day Is Just Ducky

Hello friends!  I'm sharing a clean and simple card I made using one of the new releases by Streamside Studios.

These images and sentiment are from the A Ducky Day clear stamp set.  You can also find this set in digitals if you prefer working with those.  I die cut a stitched scalloped rectangle, inked it with Salty Ocean Distress Oxide Ink, and adhered it to my card.  I splattered the panel with water and thinned white gouache.  I colored the images with copics and fussy-cut them.  I stamped the sentiment on the card and then adhered the colored images with foam tape.

Thanks so much for stopping by!  I hope you have a fabulous day!

Hugs, Anita    

Friday, April 19, 2024

You Make My Heart Smile

Hello friends!  Today I'm sharing a card I made for a fun challenge over on the Lawn Fawnatics Challenge Blog!

I used the All My Heart stamp set for my card.  I colored the stamped images with copics and used a black gel pen on the mouse eyes.  I die cut the images with the All My Heart Lawn Cuts.  I used the Stitched Rectangle Stackables Lawn Cuts to die cut two panels from white card stock.  I inked the edges of the larger panel with Kitsch Flamingo Distress Oxide Ink.  I inked the Heart Garden Stencil on the smaller panel with distress oxide inks.  I also used distress inks to create the grassy area and the cloudy sky.  I matted the smaller panel onto the larger one, and then adhered them to my card base.  I stamped a sentiment from the same stamp set and then adhered the cute mice with foam tape to give my card some dimension.


I'm entering my card in the Lawn Fawnatics Challenge 171 - Bingo.  I used the vertical "I" column of bright, critter, lawn cuts, stamp, and cute.  I'm also entering my card in the Simon Says Wednesday Challenge - Stencil It.

Thanks so much for stopping by.  I hope you have an amazing weekend!

Hugs, Anita      

Hello crafty friends!  Today I'm sharing a card featuring one of the new releases in the Streamside Studios shop! 


These adorable images are from the A Ducky Day stamp set.  I used the clear stamp set for my card but the images are also available as digis if you prefer working with those.  My card is a mini-slimline measuring 3.25" x 6.25".  I die cut the grass and water from white card stock, inked them with distress oxide inks, and splattered them with water and watercolor paints.  I used a stencil to ink the clouds in the sky.  I stamped the images, colored them with copics, and fussy-cut them.  I adhered the images with foam tape and added Nuvo Crystal Glaze to the duck beaks and feet, and the bubbles.

Thank you so much for stopping by.  I hope you have a wonderful day!

Hugs, Anita   

Thursday, April 18, 2024

A Little Bear Hug Love

Hello crafty friends!  Today I'm sharing a card featuring a stamp that the Rubber Stamps company sent me.

The Rubber Stamps company invited me to join their April "Inspired By Nature" challenge and of course I said yes!  This cute image is A Little Bear Hug Love.  I colored the image with copics, used a white gel pen to add polka dots to the heart, and fussy-cut the bear.  I used a black gel pen on the bear's nose.  I inked a 4.25" x 5.5" panel of white card stock with Tumbled Glass Distress Oxide Ink.  I used dies from my stash to die cut the grass, tree, and tree foliage.  I inked the die cuts with distress oxide inks and splattered them with watercolors to add some visual interest and texture.  The sentiment is from the same stamp set.  I adhered the tree directly to my card and then adhered the bear, grass, and tree foliage with foam tape.

Thanks so much for stopping by.  I hope you have a fabulous day!

Hugs, Anita 

Wednesday, April 17, 2024

Good morning crafty friends!  We have a new release today in the Streamside Studios shop! 

These adorable images are from the Par-tea Pandas stamp set.  This set has so many cute images and sentiments so be sure to stop by the shop and check it out!  I inked the front of my card with Spun Sugar Distress Oxide Ink and splattered it with thinned white gouache and gold watercolor paint.  I stamped all the images on Neenah card stock, colored them with copics, and fussy cut them.  I used a white gel pen to add highlights to the boba beads.

Copics:

Panda - C5, C3, C1, C0, C00; E01

Boba Tea - E49, E47, E44, E43, E42; E35, E33, E31, E30, E50, E000

Pink - RV55, RV52, RV10, RV00

Blue - BG05, BG02, B000

Green - YG17, YG13, YG01

Thanks so much for stopping by.  I hope you have a great day!

Hugs, Anita

Monday, April 15, 2024

It's Your Special Day

Happy Monday crafty friends!  Today I'm sharing a birthday shaker card using a new stamp set by Pink & Main.


This sweet image is from the Mice Birthday stamp set.  I cut a 4.25" x 5.5" panel of white card stock, embossed it with a polka dot embossing folder, and adhered it to my card.  Next, I die cut a circle and frame and sponged them with Peacock Feathers, Picked Raspberry, and Wilted Violet Distress Oxide Inks.  I spattered them with water and once they were dry I stamped a sentiment on the circle.  I adhered a circle of acrylic behind my frame and then adhered foam tape to the back of the frame.  I added sequins to the circle and then adhered the frame to create a shaker card.  I colored the image with copics and adhered it to my card with foam tape.

Copics:
Mouse - C3, C1, C0, C00; E01, E00, E000; R20
Purple - V15, V12, V01
Pink - RV55, RV52, RV10
Blue - BG05, BG02, B000

Thanks so much for stopping by.  I hope you have a fabulous week!

Hugs, Anita

Saturday, April 13, 2024

May Your Holidays Be Wrapped In Happy

Hello crafty friends!  Today I'm sharing a Christmas card I created for some challenges over on the My Favorite Things Blog.


These cute snowmen are from the JB Snow Happy stamp set.  I colored them with copics and fussy cut them.  I used a black gel pen on the snowman's eyes and a white gel pen on both of the snowmen's cheeks.  I cut a 4.25" x 5.5" panel of pattern paper an adhered it to my card.  I die cut circles from both white card stock and blue card stock.  I splattered the blue circle with thinned white guache and adhered a snowy slope on both.  I matted the blue circles on the white circles and adhered them to my card.  I adhered the snowmen to the card with foam tape.  I stamped a sentiment from the JB Gnome For The Holidays stamp set and adhered it to my card.

I'm entering my card in the following challenges:

Thank you so much for stopping by!  I hope you have a wonderful weekend!

Hugs, Anita

Thursday, April 11, 2024

You Are Sew Amazing

Hello friends!  Today I'm sharing a card I made using lots of products by Lawn Fawn!


These adorable images are from the Sew Very Mice stamp set.  I stamped them on Neenah card stock, colored them with my copics, and die cut them using the coordinating Lawn Cuts.  I used the Large Stitched Rectangle Stackables to die cut a 4.25" x 5.5" rectangle from Knit Picky Lost Mitten patterned paper and attached it to my card.  I die cut a piece of white card stock, inked it with Victorian Velvet Distress Oxide Ink, and adhered it on the bottom of my card.  I stamped one of the sentiments along the bottom edge of my card.  I used the Embroidery Hoop Lawn Cuts to die cut the embroidery hoop from white, kraft, and gray card stock.  I also inked a piece of white card stock with Victorian Velvet and adhered it behind the embroidery hoop.  I adhered the hoop and all the images with foam tape to give my card dimension.  


Thanks so much for stopping by.  I hope you have a fabulous day!

Hugs, Anita

Wednesday, April 10, 2024

Just A Little Note

Hello crafty friends!  Today I'm sharing a card I made for a Newton's Nook challenge over on their Inky Paws  Challenge Blog

I made this card for Challenge #220 with a theme of polka dots.  I die cut a scalloped rectangle from red polka dot paper and adhered it to a black card.  Next, I die cut a stitched rectangle from white card stock and inked it with Mowed Lawn and Tumbled Glass Distress Oxide Inks.  I stamped the sentiment on the rectangle and matted it onto black card stock.  I stamped the adorable image from the Garden Mice stamp set, colored it with copics, and fussy cut it.  I used a black gel pen on the mouse's eyes and adhered it to my card with foam tape.

Thank you so much for stopping by!

Hugs, Anita


Tuesday, April 9, 2024

Swimming By To Say Hi

Hello friends!  Today I'm sharing a card I made using clear stamps by Sweet November Stamps!

The stamps I used are Fairwees Make A Splash, Fairwee Lynn, and Fairwee Beck.  My card is a slimline card that measures 3.5" x 8.5".  First, I stamped all of the fairwees on my card.  Next, I stamped the fairwees on masking paper, fussy cut them and placed them over the images.  Then I stamped the background scenery.  I colored everything with copics.  I used a white gel pen on the hairbow an to add highlights to the water.

Thanks so much for stopping by.  I hope you have a fabulous day!

Hugs, Anita 

Sunday, April 7, 2024

You're Some Kind Of Wonderful

Hello crafty friends!  Today I'm sharing a card I made for a sketch challenge over on the My Favorite Things Blog! 

These sweet stamps are from the You Bring Sunshine stamp set.  I colored the images with copics and die cut them using the coordinating dienamics.  I used a black gel pen on their eyes and noses, and a white gel pen on their cheeks.  I inked the front of my card with Mowed Lawn and Tumbled Glass Distress Oxide Inks.  I used a Stitched Scalloped Edges Die-namics to die cut the border along the top of my card.  The sentiment is from the Fox and Friends stamp set (retired set).

I'm entering my card in the MFTWSC 692.

Thanks so much for stopping by!

Hugs, Anita

All Good Things

Hello friends!  Today I'm sharing a card I made for a color challenge over on the My Favorite Things Blog!

I used images from the Rain or Shine stamp set.  I colored the stamped images with Copics and fussy cut them.  I used a black gel pen on the girl's eyes and the duck's eyes, and I used a white gel pen to add polka dots to her boots.  I inked the front of my card with Salvaged Patina Distress Oxide Ink and then splattered it with both white and blue watercolor paints.  I stamped a sentiment on my card and then adhered the stamped images with foam tape.

Copics:

Skin - E13, E11, E21, E00, E000, R20

Hair - E37, E99, E97, YR24

Duck - BV01, Y08, Y06, Y02

Clothes/Umbrella - R66, R55, R52, RV10; YR07, YR04, YR02; BG13, BG11, BG10; BV01, Y08, Y06, Y02

Thanks so much for stopping by.  I hope you have a fantastic day!

Hugs, Anita

I'm entering my card in the MFT Color Challenge 233.  

Saturday, April 6, 2024

Happy Birthday Wishes

Good morning crafty friends!  Today I'm sharing a birthday card featuring a fun digital stamp from the Amanda Jayne Designs etsy shop!

I printed the cute cow on Neenah card stock, colored it with copics, and fussy cut it.  I cut a panel of white card stock and inked the grass and clouds with distress oxide inks.  I added a border of bright pattern paper on the left side and adhered this to my card front.  I stamped a birthday sentiment from a stamp in my stash and adhered the cow with foam tape.  I added a few tiny die cut hearts that I colored with copics to match the flower bouquet.

Thanks so much for stopping by.  I hope you have a wonderful day!

Hugs, Anita

I'm entering my card in the Simon Says Wednesday Challenge - Happy Birthday 

Friday, April 5, 2024

Just Bee-Cause

Good morning crafty friends!  Today I'm sharing a sweet card featuring a new digital stamp set from the My Enchanted Colors ko-fi shop!


I knew as soon as I saw the new stamp set that I had to have it, there are so many adorable images!  You can find My Enchanted Colors and a link to her ko-fi shop over on Instagram.  I used some pattern paper from my stash to create the base of my card.  Then I die cut a pierced square, inked it with distress oxide inks, and matted it on black card stock.  I printed the images on Neenah card stock, colored them with copics, and adhered them to the card with foam tape.  I used a black gel pen on the bunny eyes and added white highlights to the flower with a white gel pen.

Thanks so much for stopping by.  I hope you have a fabulous day!

Hugs, Anita

Monday, April 1, 2024

Hi Hunny!

Hello crafty friends!  Today I'm sharing a card I made for the weekly sketch challenge over on the My Favorite Things Blog!

These adorable bees are from the Honey Bees stamp set.  I colored them with copics and then die cut them using the coordinating die-namics.  I followed the sketch and assembled my card base using black card stock and some yellow pattern paper from my stash.  I inked a white rectangle with Wild Honey Distress Oxide Ink and adhered it to my card.  I adhered the bumble bees with foam tape to give my card some dimension.

Thanks so much for stopping by!  I hope you have a wonderful week!

Hugs, Anita

I'm entering my card in the MFTWSC 691.

I'm entering my card in the Simon Says Wednesday Challenge - Anything Goes