Monday, August 31, 2020

For My Favorite Boooooo!

Good morning everone!  Today I'm sharing a Halloween card using one of the new stamp sets from Paperie Ink.

Today I'm using the new My Boo stamp set.  I started my card by diecutting a 4.25" x 5.5" stitched rectangle, a stitched circle, and a stitched grassy slope from bristol card.  I sponged distress oxide inks on all three pieces of bristol and spattered them with water drops.  Once dry, I spattered them with thinned white and black acrylic paints.  I adhered the stitched rectangle to my card base and then stamped the row of tombstones along the edge of the grassy slope.  I adhered the moon and a diecut tree directly onto my card with liquid glue and I adhered the grassy slope with foam tape.  I stamped the images on Neenah cardstock, colored them with copics, and fussy-cut them.  I used a black glaze pen on the ghosts' eyes and adhered the stamped images with foam tape.  

Thanks so much for stopping by.  I hope you have an amazing week!

Hugs, Anita 

Monday, August 24, 2020

When Black Cats Prowl ...

Good morning and happy Monday!  Paperie Ink has a new release in the shop and it's all about Halloween and Fall.  Be sure to check the new stamp sets out! 

Today I'm using images from the new Happy Haunting stamp set.  This set has adorable puppy and kitty trick-or-treaters, along with accessory stamps.  The bats are from the Oh Bats stamp set.  I started my card by cutting a slimline cardbase which measures 3.5" x 8.5".  I also cut a piece of Halloween pattern paper that measures 3.5" x 8.5" and adhered it to my card base.  Next I diecut three circles from bristol card, sponged them with distress oxide inks, and spattered them with water drops.  I also sponged a piece of paper for the sentiment and adhered the diecut circles and sentiment to my card.

I stamped all the images on Neenah cardstock, ran them through my ScanNCut, and colored them with copics.  I used a black glaze pen on the kitten's eyes and the bats' eyes and noses.  I used a white glaze pen to add some highlights to the images.   I adhered all the images with foam tape.


Cats - W7, W5, W3, W1; E02, E01, E000
Witch Hat - V17, V15, V12; YG17, &G03, YG01
Pumpkins - YR18, YR14, YR12, Y18; YG67
Bats - C7, C5, C3

Thanks so much for stopping by.  I hope you have an amazing week!

Hugs, Anita

Tuesday, August 18, 2020

Going The Extra Mile To See You Smile

Happy Tuesday everone!  Today I'm sharing a clean and simple card using stamps from Paperie Ink.


I used stamps from the Three Bears stamp set.  This stamp set includes three bears, birds, fun accessories, and sentiments.  It's perfect for making cards to let your family and friends know that you are thinking of them, especially during this trying time.   I stenciled clouds onto the base of my card using Spun Sugar Distress Oxide Ink.  I sponged some bristol card with Cracked Pistachio Distress Oxide Ink, diecut it using a grass die, and adhered it to my card base with foam tape. I stamped the sentiment onto black cardstock and heat embossed it with white embossing powder.  I stamped the images on Neenah cardstock, ran them through my ScanNCut, and colored them with copic markers.  I used a black glaze pen on the bear's eye and nose.  I adhered the images with foam tape and then added a few tiny diecut hearts for embellishments.  

Copics Used:
Bear - E33, E31, E30; E02, E00, E000; 100
Bicycle - V12, V01, V000; C7, C5
Bird - BG05, BG01, B000; Y35

Thanks for stopping by!

Hugs, Anita 

Monday, August 17, 2020

Leaves Are Falling, Autumn Is Calling

Good morning and happy Monday!  Did you know that Paperie Ink has a new release in the shop?  The new release is all about Halloween and Fall and there are five adorable new stamp sets available - go check them out!!! 


Today I'm using the new Autumn Is Calling stamp set.  This set has the cutest little bunny scarecrows, sunflowers, pumpkins, and crows - everything you need to make fun fall cards!  I started my card by cutting a slimline cardbase which measures 3.5" x 8.5".  I also cut a piece of bristol card that measures 3.5" x 8.5".  I sponged distress oxide inks on both the bristol and the card base and spattered some water drops.  Next I used a rounded rectangle die to diecut four windows in the bristol card.  I stamped one of the sentiments from the stamp set in the top window area and then adhered the bristol card with foam tape.


I stamped all my images on Neenah cardstock, ran them through my ScanNCut, and colored them with my copics.  I added some white highlights to the sunflowers with my gel pen, and I used a black glaze pen on the scarecrow and crows' eyes.  I adhered all the images with foam tape to give my card some dimension.


Thanks so much for stopping by!  I hope you have an amazing week.

Hugs, Anita

Saturday, August 15, 2020

The Greeting Farm - August Release & Blog Hop

 
The AUGUST 2020 Release is now available for purchase in The Greeting Farm Store! Our first set called Cute Couple features a sweet boy and girl couple ready for fall!  Next we had Unicorn Dreams that are perfect for making fun, magical scenes!  Our third set is Cheeky Birthday, a gorgeous young lady ready to celebrate her big day.  Lastly, we have Birthday digital sets that provide endless possibilities for making birthday cards!  
 

I used the fun Unicorn Dreams to make a fun and colorful card that any little girl (or maybe even big girl) would love!  My slimline card measures 3.5" x 8.5" and I used distress oxide inks to create the cloudy background.  I colored the unicorns with copics and adhered them to my card.  I also added a few tiny diecut hearts for embellishment.  


To celebrate we are having a short BLOG HOP, where one lucky fan will take home the 3 Clear Stamp Sets! You have until AUGUST 18th, 12pm CST/1pm EST to leave your comments on each Designer's Blog and The Greeting Farm Blog (letting us know you completed the hop). Please only leave 1 comment! We will announce the random winner later in the week on the Blog and in our Facebook Group: The Greeting Farm Fan Page.

NOTE: Please use the same name on all the blogs when leaving a comment, and do not pick the Anonymous option when leaving a comment (otherwise we won't be able to verify that it's you). Thank You!

TGF DesignTeam:
 
 AMY

 ANITA   (you are here)

CYNTHIA
 
JESSIE 


This is a short hop and definitely worth playing along! If you want to grab your faves now, you can purchase the new Clear Stamps and Digis HERE. We will have more cards featuring the new Clear Stamps from our Design Team Leaders starting on the 16th so be sure to stop back by The Greeting Farm Blog to see more inspiration. 

Happy hopping!

Hugs, Anita


Friday, August 14, 2020

The Greeting Farm - August Previews Day 4

Hello and welcome to Day 4 of The Greeting Farm previews of the August release!  Today I'm sharing a card that features the new Birthday Party 2 - digital printable.


The birthday digis being released this month are so fun!  I love this one with all the little party animals so I printed it on Neenah cardstock, trimmed it to 4.25" x 5.5", and colored it with copics.  I used a black marker to fill in the letters on the banner and I used a black glaze pen on the animal noses.  

Please stop by tomorrow for our blog hop!  Meanwhile, stop by The Greeting Farm Blog to see what the rest of the team created with the new digis.  

Thanks so much for stopping by!

Hugs, Anita

Thursday, August 13, 2020

The Greeting Farm - August Previews Day 3

Hello and welcome to Day 3 of The Greeting Farm previews of the August release!  Today I'm sharing a card that features the new Cheeky Birthday.


This stamp set features one of the beautiful Cheeky images!  I stamped the Cheeky on Neenah cardstock, cut her using my ScanNCut, and colored her with copics.  I used the sofa and table from the Build-a-Livingroom Digi and printed them on Neenah cardstock and masking paper.  I masked the sofa and table and used a stencil and Spun Sugar to stencil the brick pattern on the wall.  I colored the sofa and table with copics also.  I stamped the sentiment on black cardstock, heat embossed it, and diecut it using a flag die.  I applied Nuvo Crystal Glaze to the heart on the cupcake and adhered it on the tabletop.  I adhered the gorgeous Cheeky and her birthday present with foam tape.    

Copics Used:
Skin - E13, E11, E21, E00, E000, R20
Hair - 100, C7, C5, C3, C1
Dress - E09, YR18, YR14, YR12
Shoes - N8
Sofa - B05, B02, B01; C3, C1
Table - E33, E31, E30
Gift - Y18, Y15, Y13; YG17, YG03, YG01
Cupcake - E55, E53, E51; R85, R83, R81   I
    
Please stop by tomorrow for our fourth day of previews.  Meanwhile, stop by The Greeting Farm Blog to see what the rest of the team created today.

Thanks so much for stopping by!

Wednesday, August 12, 2020

The Greeting Farm - August Previews Day 2

Hello and welcome to Day 2 of The Greeting Farm previews of the August release!  Today I'm sharing a card that features the new Unicorn Dreams.


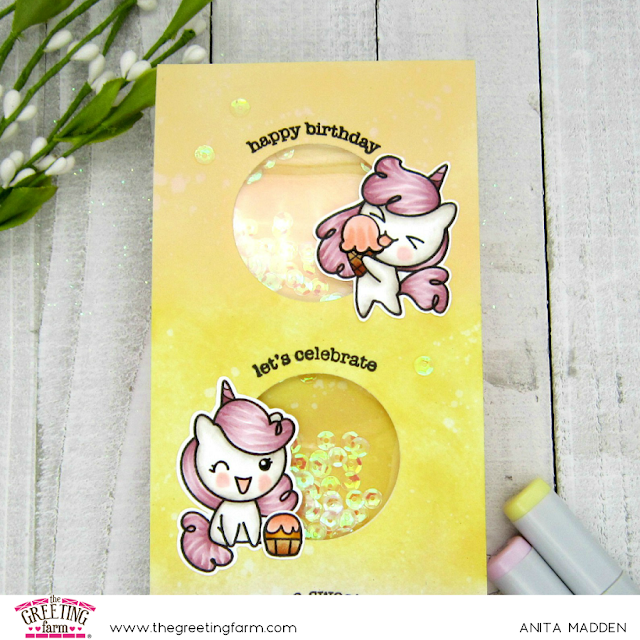
This stamp set features lots of fun and adorable unicorns! I stamped the images on Neenah cardstock, cut them using my ScanNCut, and colored them with copics.  I cut my card base and a piece of bristol card to measure 3.5" x 8.5".  I sponged the bristol card with distress oxide inks and spattered it with water.  Next I diecut three circles in the bristol card.  I used stamps from the Make A Wish stamp set and stamped the sentiments just above the window openings.


I sponged the same distress inks on the base of my card behind the window openings.  I adhered acetate and foam tape to the back of my front panel so I could create a shaker card.  After I filled the openings with sequins, I assembled my card.  I used liquid adhesive to adhere the unicorns and cupcakes and then added a few clear sequins to the front of my card.  


Copics Used:
Unicorns - W2, W0; RV95, RV93, RV91
Ice Cream - E33, E31; R12, R11, R00
Cupcakes - E33, E31; YR23, YR21; R12, R11, R00

Please stop by tomorrow for our third day of previews.  Meanwhile, stop by The Greeting Farm Blog to see what the rest of the team created today.

Hugs, Anita

Tuesday, August 11, 2020

The Greeting Farm - August Previews Day 1

Hello and welcome to Day 1 of The Greeting Farm previews of the August release!  Today I'm sharing a card that features the new Cute Couple.


Isn't this couple adorable?  Looks like they're dressed for fall and I love her little fuzzy hair bauble!  I made this a 5" x 7" card so that I could include both of the images on my card, and I colored them to resemble my grandson and granddaughter!  I printed the images on Neenah cardstock, ran them through my ScanNCut, and colored them with copic markers.  I sponged the base of my card with distress oxide ink and attached a strip of fall pattern paper along the edge.  I diecut a small heart and stamped one of the sentiments from the stamp set.  I adhered the images with foam tape and that finished off this clean and simple card.

Please stop by tomorrow for our second day of previews.  Meanwhile, stop by The Greeting Farm Blog to see what the rest of the team created today.

Monday, August 10, 2020

I Miss The Shell Out Of You

Good morning and happy Monday!  Today I'm sharing a card using stamps from the latest Paperie Ink release. 


I used stamps from the new Water You Up To stamp set.  This stamp set is full of adorable little turtles, along with accessories and fun sentiments!  I cut a piece of bristol card 3.5" x 8.5", sponged it with distress oxide inks, and adhered it to the base of my card.  I stamped some of the fish, seaweed, and a sentiment onto the inked panel and then adhered a window that I diecut a from white cardstock.


I stamped the images on Neenah cardstock, ran them through my ScanNCut, and then colored them with copic markers.  I used a black glaze pen on the turtles' eyes and adhered the images with foam tape.  I added a few clear bubble embellishments to finish my card.  used a white gel pen to add highlights to some of the images. 


Copics Used:
Turtles - YG09, YG06, YG11; G46, G43
Coral - Y38, Y18, Y15, Y13; RV25, RV23, RV21; V17, V15, V12
Clam - R22, R20, R00
Starfish - Y26, Y23, Y13

Thank you for stopping by!

Hugs, Anita

Thursday, August 6, 2020

Seas The Day

Good morning everyone!  I'm sharing a card I created for The Greeting Farm.


This lovely mermaid is from the Mermaids Galore Kit.  This big stamp kit has lots of beautiful mermaids along with fabulous accessories and sentiments for building great underwater scenes!  I also used some stamps and a sentiment from the new Furmaids stamp set.  I diecut a piece of bristol card with a stitched rectangle die and ink blended distress inks in Chipped Sapphire, Blueprint Sketch, Wilted Violet, and Peacock Feathers.  I colored all the stamped images with copics and then fussy cut them.  I adhered the images with foam tape and added a few clear sequins to give my card a little bit of sparkle.

Copics Used:
Skin - E13, E11, E21, E00, E000, R20
Hair - E44, E33, E31, E30
Tail - BG09, BG05, BG01; RV25, RV23, RV21, RV10
Seaweed - YG17. YG03, YG01
Starfish - Y26, Y18, Y15, Y13
Fish - Y38, Y18, Y15, Y13; V15, V12, V01; BG05, BG01; B000

Thanks so much for stopping by!  I hope you have an amazing week!

Hugs, Anita

Monday, August 3, 2020

Paperie Ink - Splish Splash

Good morning!  Today I'm sharing another fun card using new stamps from Paperie Ink.


I used stamps from the new Splish Splash stamp set.  These stamps are so cute and work perfectly for all your summer and ocean-themed cards.  I used a circle die to cut three openings in my card front and then lightly blended some distress inks around the edges of the panel.  I did some ink smooshing on a piece of watercolor paper using distress inks.  I stamped the bubbles from the stamp set and heat embossed them with white embossing powder.  I adhered the watercolor panel onto the front of my card base and then adhered the diecut white cardstock with foam tape.  I stamped the images on Neenah cardstock, cut them with my ScanNCut, and then colored them with copics.  I used a black glaze pen on the hippo and fish eyes, and applied Nuvo Crystal Glaze on the little pearl in the clam.  I adhered all the imagaes with foam tape.  I heat embossed a sentiment from the stamp set, diecut it using a flag die, and adhered it to my card.

Thanks so much for stopping by.  I hope you have a beautiful week!

Hugs, Anita