Hello friends! Today I'm hosting a new blog series (The 12 Days of Gift Giving) over on the Your Next Stamp Blog. Be sure to stop by the YNS Blog to check out the awesome projects my teammates have been sharing this week.
I love making my own gift tags to dress up presents. You can make a plain and inexpensive gift bag look fabulous just by dressing it up with a handmade tag.
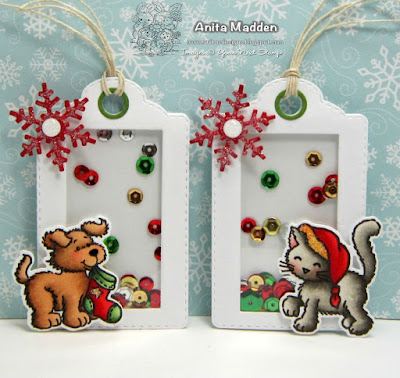
Here's the picture of the finished tags I made. My grandson loves puppies and my granddaughter loves kitties so I thought these sweet little shaker tags would be perfect to go on one of their packages. These are really simple to make and they're definitely one-of-a-kind, right?
For my tags I used the Winter Fun Tag Die Set. I started by die cutting four of the tags from the set.
Next I used the smallest rectangle die from the Stitched Rectangle Die Set. I centered the rectangle die on the tag and used some tape to hold it in place and then ran it through my die cutting machine.
I did this to 2 of the tags to create the shaker window. These pieces will be the front of the tag.
I cut 2 pieces of acetate a little larger than the shaker windows. I apologize for the glare from the acetate but I wasn't able to get a picture with no glare. Turn the front pieces of the tags face down and apply a thin line of glue to the backs and adhere the acetate. I also applied some foam tape around the edge. My foam tape was too wide so I just trimmed it down until it fit around the edge of the tag without showing through the window. Be careful not to leave any gaps in the foam tape because that's what holds the sequins inside the shaker - you don't want those pretty sparklies escaping, right?
In the photo above, the front of the tag is face down on the left. The tag on the right is the back of the tag. Since the sequins always seem to settle to the bottom of the shaker, I like to adhere a few sequins in the "upper portion" of the shaker window on the inside of the back tag (hope that wasn't too confusing). Once you've glued a few sequins to the back part of the tag let the glue completely dry before you assemble the shaker tag (otherwise you end up with a wet, sticky mess - ask me how I know lol). Once the glue is dry, remove the backing on the foam tape and place the back tag onto the front tag.
This is what your tag will look like at this point. Then you can decorate it any way you like.
I used the sweet pup and cat from the Cozy Christmas Jessica stamp set. I colored them with copics and cut them out using the coordinating die set. I also used the snowflake from the Winter Fun Tag Die Set. I added some Glamour Dust to the pup's stocking, the cat's hat, and the snowflakes and adhered a Holly Jolly Sparkly Gumdrop to each snowflake.
I hope I've inspired you to use the Winter Fun Tag Die Set to create your very own gift tags this holiday season! Be sure to stop by the Your Next Stamp Blog each day to see the amazing projects the team will be sharing.
Thanks for stopping by.
Hugs, Anita


OMG Anita, these tags are ADORABLE! I have to pin these to try, although I don't have those tag dies! Hmmm?? Note to self: GET those dies! LOL
ReplyDeleteThese are adorable!!! I think I am going to have to make my nieces and nephews some shaker tags!!
ReplyDeleteWow Anita these are amazing x
ReplyDelete